


Dieser Beitrag ist auch auf verfügbar.
If you’d like to become a really good pool player, you can’t get around practicing a lot. But what if you don’t have huge ambitions? You just don’t want to look completely dumb against your buddies on Friday night? These pool tips are for you.
Pool Tip #1: Aim from above
Most people go down for the shot and then start aiming. The problem: Their bodies are aligned differently every time. Try it the other way around: Look at the line you’d like the cue ball to travel along, while you’re still standing upright. And then simply try to put your cue on that line (behind the cue ball) and put your body next to it. Now you just have to move the cue forward and boom – the ball goes down.
Ok, that was a very simplified summary of a complicated process, but just try it and trust your body to find a way to do it. By the way, I’m going to explain below how you can find the correct aiming line.
Pool Tip #2: Use less power
A lot of casual players smack the balls like crazy. Besides the fact that many bad things can result from that (cue ball drops into a pocket or flies off the table), precision is suffering. Something you as a casual player don’t have to much of anyway (don’t take that personally…).
This applies to the break shot, too: If the cue ball hits the rack of balls only partly because you had to smack the hell out of them, you gain less than by hitting the rack fully with less speed. So, have a couple of donuts less a day and life will be better at the pool table.
Pool Tip #3: Rack the balls properly
To get a nice spread of the balls after the break, they have to be racked properly. Properly means that all the balls should be touching the neighboring balls, with as few gaps between them as possible. On most bar tables this isn’t very easy, so do it very carefully.
Spinning the 8-ball after racking is a no-go. Looks kinda cool, but results in the nicely set up balls moving apart again. Which results in the balls not spreading well at the break.
Pool Tip #4: Think about what the cue ball is going to do
You might have heard about it: Good players usually position the cue ball nicely for the next shot. This way they manage to clear the whole table without letting their opponent shoot.
Even without these skills you can start thinking about what the cue ball is going to do. If you cut a ball on the left side, the cue ball will always move to the left – and vice versa. This knowledge might already help. Also the speed you play the cue ball with makes a difference. The more power you apply, the farther the cue ball will travel after hitting the object ball.
Pool Tip #5: Chalk your cue
Everyone knows pool chalk. But many don’t know that they should use it, too, and moreover, what for. Chalk keeps the tip of the cue from slipping off the cue ball. The tip consists of leather, which is a hard and slippery material. The cue ball also consists of a hard and slippery material. So when both meet each other, it’s getting slippery. Chalk makes sure there’s enough friction between both – like grit on an icy road.
So, always use chalk, ideally before each shot. It’s important that you don’t drill the cue into the chalk like into a pencil sharpener, but rather “paint” the tip so it’s completely covered with chalk.
Pool Tip #6: Aim correctly
First the good news: Everybody can aim. If you can point at something with your finger, you can aim. Another indicator is if you can reach for things without missing. Congratulations!
Now you just have to figure out how to apply this skill to pool. At the pool table your head, especially your eyes, have to be aligned correctly in relation to the aiming line and your cue.
Where exactly now? Let’s go back to the example of pointing at something with your finger. Reach out with your arm and point at some item at least 15 feet away with your index finger. Now, without moving, look at your index finger. It’s somewhere between your eyes, either exactly in the center or slightly left or right of it. This is exactly the place where the cue has to be so your eyes can see where it’s pointing at. Like on this picture:


Yes, I still had hair. But you can already guess why I chose my current haircut.
You can see that the cue rests between my eyes, but not exactly in the center. Often I see beginners holding the cue next to the head or tilting the head to one side instead of keeping it straight. That causes a big problem: The line that your eyes see doesn’t match the actual line your cue is pointing along. Which will make you miss the shot, although you might have executed the shot well.
So, connecting this with tip #1: Your head should already be on the correct aiming line while your still standing upright and shouldn’t leave the line until you bent down for the shot. If you’re not sure anymore after bending down, rise a little bit and check again if you’re still aiming correctly.
Pool Tip #7: Aim for the right spot
I just introduced the term “aiming line” – and I didn’t even flinch – without explaining where it’s actually located to pocket a ball. Let’s look at this situation:
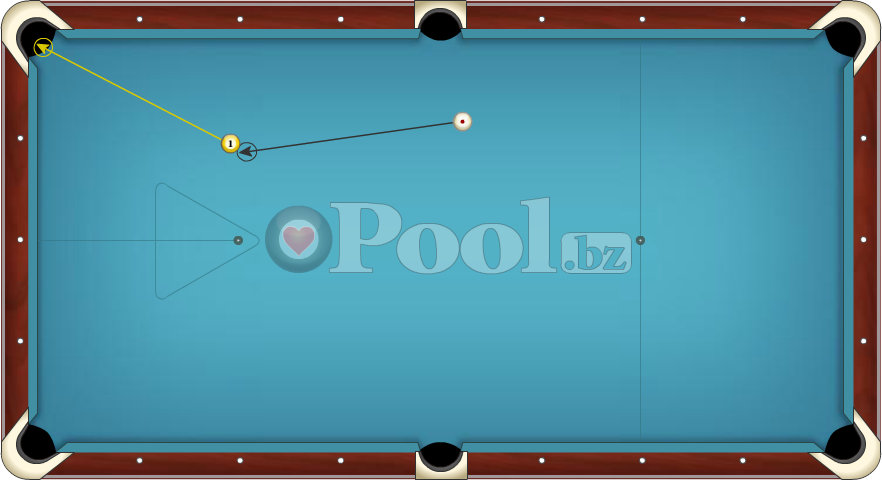

First we have to find the line the object ball (here: the yellow 1) has to travel in order to drop into the pocket. From this results the spot where cue ball and object ball have to touch. In the illustration this is the spot where the black circle touches the 1-ball.
Unfortunately, it would be wrong to aim for this spot, because we would hit the object ball at a different spot. The reason is that we’re aiming with the center of the cue ball, but hitting the object ball with the edge. As a result, we have to aim for the spot where the center of the cue ball has to go, and that is the center of the black circle in the illustration.
That makes aiming so difficult, because this spot looks different from different angles. For us the aiming line on which we have to place our cue and our head, is the black line leading from the cue ball to the black circle.