Dieser Beitrag ist auch auf Deutsch verfügbar.
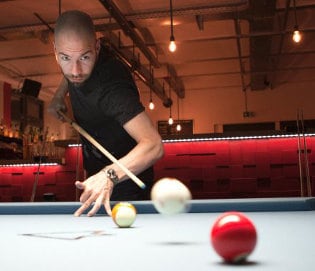
Very often people ask me: “Patrick, what’s the difference between a draw shot and a stop shot?” Fair question, since in both shots the cue ball is hit below center, and a lot of books and (self-acclaimed) experts have quite precise formulas to the sound of: For a stop shot you need to hit the cue ball one tip width below center, for a draw shot lower than that. This distinction causes quite some confusion in player’s minds, making some even think that the cue ball shows a totally different behaviour for stop and draw shots. This is nonsense, and in the following post I’ll explain why.
Stop shot and draw shot are exactly the same shot
Correct is: Stop shots and draw shots are exactly the same shots. In both cases the player applies backward spin to the cue ball by hitting it below center. Right after being hit, the cue ball spins backwards while sliding forwards. Through friction on the cloth and its own inertia the cue ball slowly loses backward rotation while still sliding forwards. Eventually it gets to a point where it doesn’t have any rotation left, before it stops sliding and starts rolling.
3 Stages
So we have three stages with this shot:
- “Rotation stage”: The cue ball rotates backwards while sliding forwards.
- “Tipping stage”: The cue ball doesn’t rotate anymore, slides forward without rotation.
- “Rolling stage”: The cue ball starts to roll.
Depending on at which stage the cue ball hits an object ball, different things will happen (to keep things simple for now, I assume that the cue ball always hits the object ball 100% fully, with no angle):
- “Rotation stage”: The cue ball transfers all the forward movement to the object ball. It shortly stops, then the backwards rotation accelerates the cue ball backwards. We’ve just played a draw shot.
- “Tipping stage”: The cue ball transfers all the forward movement to the object ball. Because it doesn’t have any rotation left, but hasn’t started rolling yet, it stops. We’ve just played a stop shot.
- “Rolling stage”: The cue ball transfers all the forward movement to the object ball and follows it slightly rolling (technically, this is not a follow shot where the cue ball is rotating forwards).
Think about this for a second and make sure that you understood: I’m talking about the exact same shot which can have three different outcomes: Draw shot, stop shot and slightly rolling shot. All depending on after which distance the cue ball hit an object ball. Meaning the same shot can be a draw shot or a stop shot. A shot that might be a draw shot at a distance of 10 inches between cue ball and object ball might only be a stop shot at a distance of 20 inches. The deciding factor for the behaviour of the cue ball after contact with the object ball is always in which state it is at the moment of contact: Which speed and which rotation does it have at that very moment? By the way, this applies to every shot, not just stop shots and draw shots.
How to measure the amount of backward rotation
How long these different stages are, meaning at which spot the cue ball tips over and starts rolling, depends on the amount of backward spin we apply.
Two factors have an impact on this:
- how far below center we hit the object ball
- how fast we accelerate the cue through the cue ball
For example, I can play the same stop shot (meaning with the same distance between cue ball and object ball) in different ways: just a little bit below center with more speed or more below center with less speed (and all the variations between). The same applies to draw shots.
Saying that it becomes clear that the statement from the beginning, stop shots are played one tip width below center and draw shots lower than that, is pure nonsense. Instead, we have to learn to measure the amount of backward spin we apply in order to play a stop shot on different distances between cue ball and object ball (I only have little tolerance here, since the tipping stage is very short) and also in order to play draw shots of different lengths. Because we don’t want to play the same draw shot every time: Sometimes we’d like to draw the cue ball just some inches and sometimes across the whole table.
What you should remember and what you should practice
Just remember these two things:
- Stop shot and draw shot are the same shot.
- You measure the amount of backwards spin by changing the spot where you hit the cue ball and with the speed you apply.
In your daily practice you should practice playing stop and draw shots with different combinations of where you hit the cue ball and the speed you apply. The longer you do this, the more precisely you will be able to play draw and stop shots. If you struggle with the general technique for a smooth and repeatable stroke, practice your stroke fundamentals first (more about this in my book).